
The Maze Prison Escape: How 38 IRA Prisoners Broke Out of H7 in 1983
At 2:30 on the afternoon of September 25, 1983, H Block 7 at the Maze looked as though it was following an ordinary Sunday routine.
Most of the block's 125 prisoners were in recreation. Twenty-four prisoners employed as orderlies were cleaning or carrying out other jobs. Twenty-four prison officers were assigned to H7, along with a hospital officer who had come into the block for his duties.
The normal routine mattered because the escape plan depended on it.
Five orderlies moved into positions around the central “circle” of H7. Each was secretly carrying a handgun.
Within roughly twenty minutes, prisoners controlled the block. The alarm had not been raised. Over the next hour and a half, the breakout would move through one security layer after another: from H7, into a kitchen lorry, through two internal gates, into the main-gate complex, and finally toward the prison perimeter. The plan did not work exactly as intended.
It still produced the largest prison breakout in modern British history. Thirty-eight prisoners took part in the moving escape party. Thirty-five crossed the prison perimeter. A prison officer died, others were shot, stabbed, and beaten, and the government ordered an inquiry the following morning.
The report that inquiry produced allows the escape to be reconstructed in unusual detail.
Why the Maze Was Different
The Maze was not an ordinary British prison operating in ordinary political circumstances.
The site had developed from the Long Kesh internment camp opened during the Troubles into a large cellular prison built around the distinctive H-Blocks. The prison became central to the conflict over the status and treatment of republican and loyalist prisoners, including the blanket protest, the no-wash protest, and the 1981 hunger strikes.
By 1983, H7 contained only Provisional IRA prisoners. That concentration mattered to the escape.
The Hennessy inquiry concluded that keeping a cohesive group of Provisional IRA prisoners together made planning and execution easier. It also found that orderlies had been allowed too much freedom and had gained knowledge of parts of the prison that should have remained outside their normal working awareness.
The physical security of the Maze was substantial. The breakout therefore did not begin by attacking the outer wall. It began by neutralizing the people and procedures controlling movement inside one H-Block.
The Part of the Prison That Looked Routine
Prison orderlies had ordinary jobs inside H7. That gave particular prisoners opportunities to move around the block without every movement appearing suspicious. The official inquiry later concluded that three appointments in particular — Brendan McFarlane, Bobby Storey, and Brendan Mead — had been serious errors of judgment because of the security knowledge and access associated with orderly work.
The prisoners did not use that freedom only on the afternoon of the escape. Hennessy concluded that a deliberate process of conditioning had taken place over time. The basic idea was to make increasingly relaxed practices feel normal. If an orderly regularly entered an area to sweep, his presence eventually attracted less attention.
If a gate was routinely opened for a familiar movement, the action became automatic. If a block developed a reputation for being comparatively calm, staff vigilance could fall. This is one of the most important findings in the official report. The breakout did not overcome every layer of the Maze by force.
It first made some security actions feel routine enough that the prisoners could get close to the people controlling them.

Five Guns in H7
The takeover began shortly after 2:30 p.m. Five orderlies — Mead, McFarlane, Storey, Gerry Kelly, and Tony McAllister — positioned themselves around the center of H7. Each had a handgun. The official inquiry later concluded that a small group of prisoners appears to have contacted the Provisional IRA outside the prison and obtained five guns for the escape.
How those guns entered the Maze is unknown. That point is worth emphasizing because later retellings sometimes identify a particular route with more confidence than the official investigation could justify. Hennessy examined supplies, vehicles, visitors, professional visits, staff searches, and prisoner-searching procedures. It found serious weaknesses in several of them.
But its conclusion remained explicit: There was no evidence establishing which route had actually been used to smuggle in the weapons and ammunition. The guns were central. The route in was not solved.
Taking the Circle
The five armed orderlies moved toward officers who controlled the most important functions in the center of the block. Mead positioned himself with senior staff in an office. McFarlane gained access to the entrance lobby by asking to sweep it. Kelly placed himself outside the communications room.
Storey and McAllister entered the officers' tea room. Then the takeover began. Staff were held at gunpoint. Keys were taken.
Prisoners in the wings simultaneously overpowered other officers. One officer was struck in the head. Another was stabbed with a handicraft knife.
In the communications room, an officer attempted to reach his stave. Kelly fired two shots. The officer was hit in the head and seriously wounded.
The gunfire was not heard by the officer controlling the gate outside the block. That allowed the next move to work. McFarlane used captured keys to leave H7 with accomplices and approached the gate lock as though he were carrying out an ordinary sweeping task. The officer admitted him.
He too was seized. At approximately 2:50 p.m., the prisoners controlled H7. No alarm had been raised.
What Happened to the Officers
The captured prison officers were moved into two games rooms. Some were required to hand over their car keys and explain where their vehicles were parked. Others were made to remove their uniforms. The prisoners bound officers, covered their heads with pillowcases, and placed them under guard.
A wounded officer was allowed medical treatment under armed supervision. Other captive staff were forced to remain at telephones and radios so that they could answer routine communications as if nothing unusual had happened. One officer received a normal telephone call while sitting under guard. A gun was put to his head while he ended the conversation without exposing the takeover.
The prisoners had captured H7. Their next problem was getting thirty-eight men out of it without triggering every gate in the prison.
The Uniforms
Approximately twelve prisoners put on officers' uniforms. This was not enough to disguise all thirty-eight men. It did not need to be. The uniforms were intended for the prisoners who would have to appear briefly in places where the presence of prison staff was expected.
The plan depended on combining disguised prisoners with a vehicle whose movement already belonged to the prison's daily routines. Meanwhile, the prisoners removed documents from the H7 office and communications room, including photographs that could help authorities identify the escapees quickly. They were not simply preparing to leave the block. They were trying to delay the response after they left it.
Escape reconstruction
From H7 to the outer perimeter
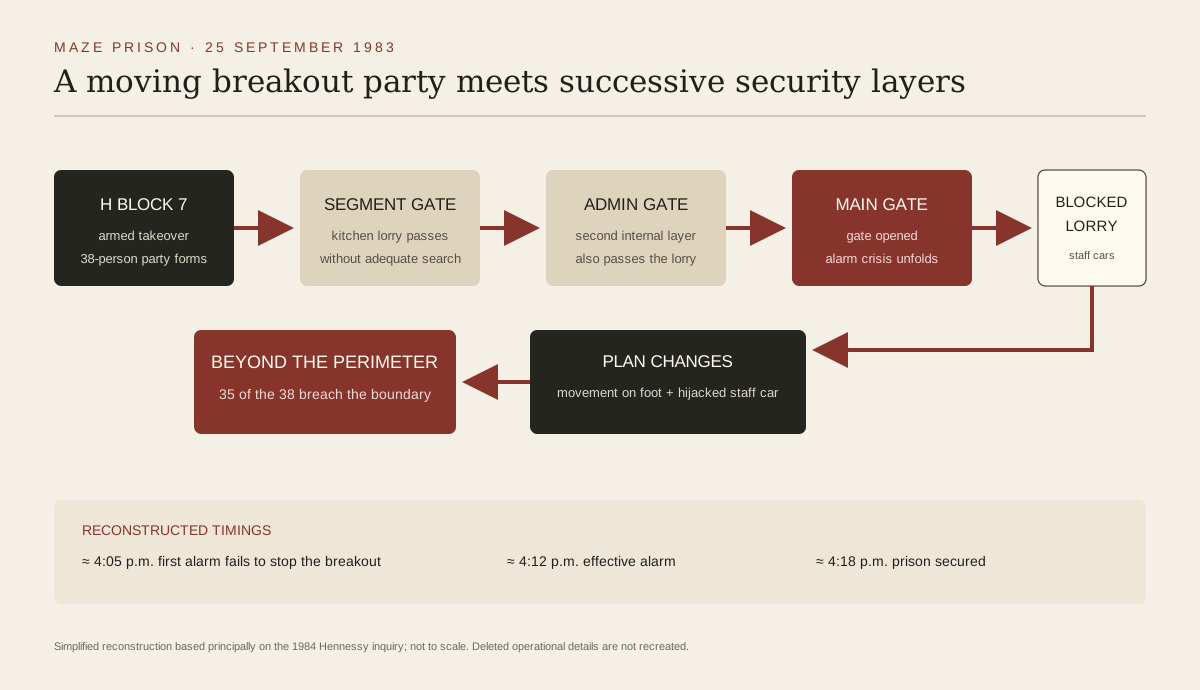
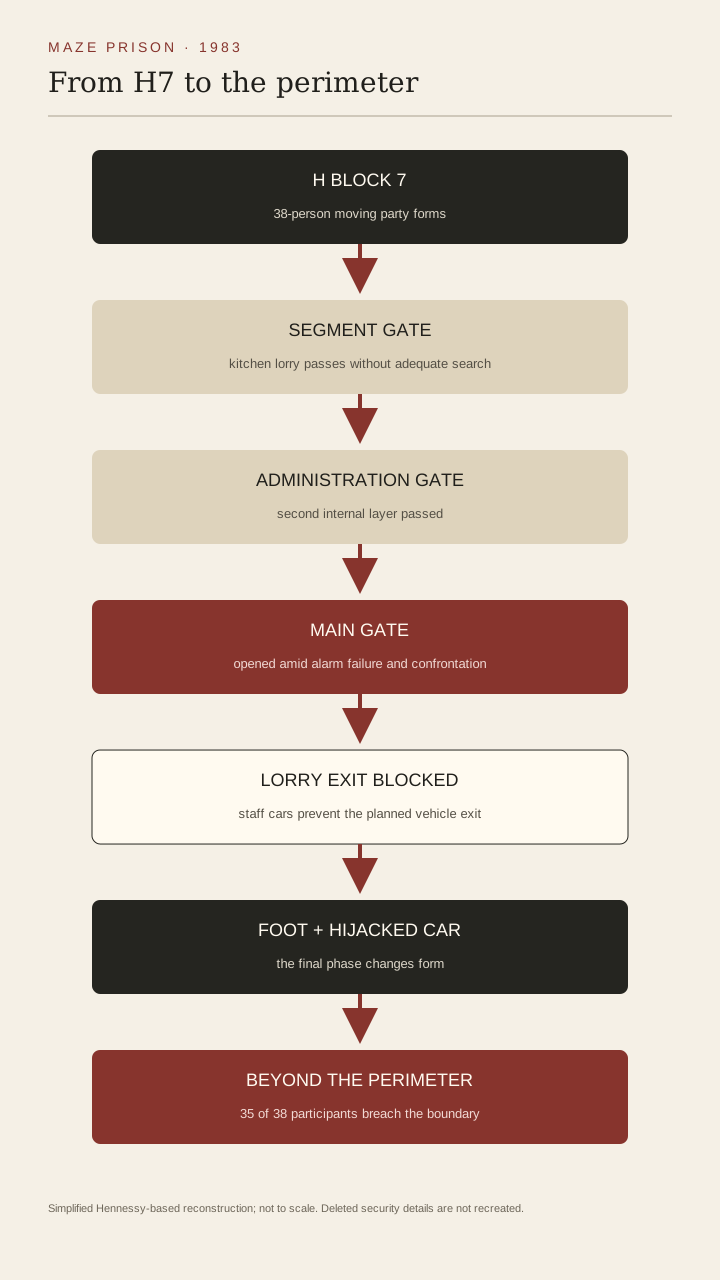
The schematic follows the moving breakout party through successive security layers without recreating deleted operational details.
- 01
H7
The armed takeover formed a moving party of 38 prisoners.
- 02
Internal gates
The kitchen lorry passed the segment and administration gates without an adequate revealing search.
- 03
Main gate
The gate was opened, but staff cars blocked the intended lorry exit.
- 04
Breakout changes
The final phase shifted to movement on foot and in a hijacked staff car.
- 05
Perimeter
Thirty-five of the 38 participants breached the prison perimeter.
Simplified editorial reconstruction based principally on the 1984 Hennessy inquiry; not to scale. Some security details in the published report were deliberately omitted, and this graphic does not recreate deleted operational information.
The Kitchen Lorry
At approximately 3:25 p.m., the prison kitchen lorry arrived with food. The vehicle and its occupants had no reason to know that H7 had been under prisoner control for more than half an hour. The prisoners admitted the lorry. The driver and prison orderly were seized.
The driver was told that the lorry would be used in the escape and that he would drive it. The coercion was detailed.
His left foot was tied to the clutch. His door lock was jammed. A cord was attached beneath his seat to something he was told was a hand grenade, although the official inquiry found that it was actually tied to the seat frame.
Gerry Kelly, dressed as an officer, lay on the passenger-side floor of the cab with a gun trained on the driver. Thirty-seven prisoners climbed into the rear. At approximately 3:50 p.m., the vehicle was ready. A rear party remained inside H7 with improvised weapons to keep the captured officers from raising an alarm too soon.
Five minutes later the lorry left the H7 forecourt.
The First Gate
The vehicle's next barrier was the segment gate. The kitchen lorry was familiar. The officer recognized the driver and prison orderly. The vehicle was allowed through without a search.
The first security layer outside H7 had failed without a confrontation. That mattered because a search of the rear of the lorry would have ended the escape immediately.
The Administration Gate
The lorry then headed toward the administration gate, the last gate before the main-gate complex. This was not its normal route, but it was not unprecedented. One detail could have looked wrong: the prison orderly accompanying the lorry should not normally have continued through that gate. The prisoners stopped briefly and concealed him in the cab with Kelly.
The officer at the administration gate saw nothing that prompted intervention. The lorry passed again without being checked. Two major controlled gates had now allowed the escape vehicle through. The prisoners were nearing the hardest part of the route.
The Main Gate Could Not Be Bypassed
The main gate was different. The prisoners could not expect a vehicle carrying thirty-eight escapees simply to drive through the entire gate complex and onto the road without further control. Their plan required them to seize it. The driver had been instructed to position the lorry so the disguised prisoners could dismount without being clearly seen.
He attempted to disrupt the plan by parking in a less favorable position. It was not enough. Ten prisoners wearing officers' uniforms got out without immediate detection. Nine entered the gate lodge armed with guns and chisels.
They held up the officers already inside and other staff who entered the building. Another prisoner confronted the officer controlling the inner vehicle gate and forced it open. The lorry was moved into the gate lock. For a moment, the prisoners were close to completing the vehicle escape.
Then the situation began to unravel.
The First Alarm
At approximately 4:05 p.m., a captive officer in the gate lodge managed to press an alarm button. The signal reached the prison's Emergency Control Room. That should have changed everything. Instead, staff in the control room telephoned the gate lodge to ask what had happened.
A senior officer answered while being held at gunpoint and said that the alarm had been activated accidentally. He tried to indicate that something was wrong. The explanation was accepted. The call ended.
The Hennessy inquiry later identified failures in alarm arrangements and communication as part of the prison's security breakdown. The escape had survived an alarm from inside the main gate.
James Ferris Runs for the Pedestrian Gate
More prison officers were arriving for duty. Each new arrival increased the number of people the prisoners had to control. Resistance inside the gate lodge grew. Officer James Ferris broke away.
He ran toward the pedestrian gate, shouting for the officer there to secure it and raise the alarm. Ferris had been stabbed three times in the chest. He collapsed before reaching the gate and later died.
The Hennessy Report records the stabbing and death as part of the breakout's casualties. CAIN's conflict chronology and Sutton material indicate a heart-related medical cause. The surviving public sources therefore support the sequence strongly but do not justify treating a simplified phrase such as “stabbed to death” as the only precise medical description.
The prisoner pursuing Ferris continued toward the pedestrian gate and stabbed other officers who had just entered the prison. The violence at the gate was now visible from the Army watchtower. But another communication failure followed. The Army operations room called the prison Emergency Control Room and asked whether there was trouble.
The control-room staff, still relying on the earlier false explanation, said everything was all right.
4:12 P.M.
A captive officer in a back room of the gate lodge then managed to overcome the prisoner guarding him and reach a telephone. He called the prison emergency number directly. This time the alarm was treated as real. Senior staff were alerted.
The Army and RUC were warned. The time was approximately 4:12 p.m. Hennessy's conclusion was concise: the alarm had finally been raised — just too late to prevent the breakout.
The Lorry Plan Fails
The prisoners succeeded in opening the main gate. The kitchen lorry was positioned to drive out. But the vehicle had remained there long enough for a prison officer outside the lodge to recognize what was happening. He directed two officers in private cars to drive into the vehicle entrance.
They blocked it. The planned lorry escape was over. This is an important part of the story because the final phase was not the execution of the original plan. The prisoners had to improvise.
They abandoned the lorry. Men spilled out toward the outer fence.
From Planned Escape to Breakout on Foot
The outer fence stood roughly twenty-five yards beyond the main gate. Most of the prisoners ran for it. Four men instead approached a prison officer's car, attacked the officer, recovered the discarded keys, and drove around the prison wall toward the external gate. Another officer saw what was happening.
He drove ahead, sounding his horn and flashing his lights to warn staff at the external gate. The hijacked car struck the gate area at speed. Two prisoners escaped. Two were captured.
Back near the main gate, a prison officer pursued another escaping prisoner. The prisoner shot him in the leg.
The Army sentry in the watchtower saw the shooting and fired, wounding the escaping prisoner in the leg. He was recaptured.
Other prisoners crossed the outer wire and scattered into the surrounding area. At approximately 4:18 p.m., the main gate was closed and the prison secured. Only minutes had passed since the effective alarm. The prisoners who had already breached the perimeter were now outside the Maze.
Breakout party and perimeter
38prisoners formed the moving breakout party
Breakout participants
Thirty-eight prisoners formed the moving escape party from H7.
Breached the perimeter
The Hennessy inquiry concluded that thirty-five prisoners successfully breached the prison perimeter.
Recaptured by inquiry reporting period
Nineteen of the thirty-eight had been recaptured, leaving nineteen still unlawfully at large at that point.
Prison officer deaths
Officer James Ferris died after being stabbed three times during the main-gate confrontation and collapsing while trying to raise the alarm.
38, 35, 19
The numbers are often compressed in popular accounts. The official inquiry gives a more useful sequence.
38
Thirty-eight prisoners formed the breakout party that used the kitchen lorry and main-gate operation.
35
Hennessy concluded that thirty-five actually breached the prison perimeter. Three were recaptured in the gate-lodge area.
19
By the inquiry period, nineteen of the thirty-eight had been recaptured. Nineteen remained at large at that point.
The government launched an extensive search involving the RUC and Army, with vehicle checkpoints established around the prison and elsewhere in Northern Ireland. Authorities in the Republic of Ireland were contacted as well.
Some prisoners were recaptured within hours. Others stayed free for years. The long-term legal histories of individual escapees became complicated, including extradition proceedings and, in some cases, later challenges to the convictions for which they had originally been imprisoned. Those individual histories matter, but they should not turn this page into biographies of all thirty-eight men.
The escape itself is the subject.
Problem → response
Escape was a sequence of problems
Each response solved a practical obstacle while often creating the next one.
- 01→
Obstacle
H7 staff and alarms
The block contained fixed posts, communications, keys, and officers capable of raising alarms.
Response
Armed orderlies positioned themselves around key staff and control points and seized the block before an alarm escaped.
- 02→
Obstacle
Movement of a large group
Thirty-eight prisoners could not move openly through the prison without immediate detection.
Response
The group commandeered the routine kitchen lorry and used uniforms for selected prisoners who needed to appear in staff areas.
- 03→
Obstacle
Segment gate
A manned internal security gate between H7 and the route toward administration areas.
Response
The familiar lorry and occupants were allowed through without a revealing search.
- 04→
Obstacle
Administration gate
The final internal gate before the main-gate complex.
Response
The vehicle again passed without a search that exposed the escape party.
- 05→
Obstacle
Main-gate lodge
The prison's major controlled exit could not simply be bypassed by the kitchen lorry.
Response
Uniformed armed prisoners infiltrated and seized the lodge and forced the inner vehicle gate open.
- 06→
Obstacle
Alarm system
An alarm activated at about 4:05 p.m. should have triggered an immediate response.
Response
A captive officer was forced to describe it as accidental; the Emergency Control Room accepted the explanation until a later direct emergency call.
- 07→
Obstacle
Blocked lorry exit
Prison staff used private cars to block the vehicle entrance after recognizing the breakout.
Response
The prisoners abandoned the lorry and attempted to cross the remaining perimeter on foot or by hijacked car.
The Security Failure Was Larger Than One Gate
The Hennessy inquiry did not explain the escape as one guard making one mistake. It identified a chain. The prisoners had guns inside H7. How the guns entered was never established.
Orderlies had been given too much freedom and access. Staff had become conditioned to practices that reduced vigilance. The H7 communications room could be seized. The block was taken without an alarm escaping it.
The kitchen lorry entered the compromised block as part of routine. The vehicle passed the segment gate without a search. It passed the administration gate without a search. Disguised prisoners entered the main gate lodge.
An alarm was triggered but not acted upon. A warning call from the Army did not correct the misunderstanding. By the time the alarm was finally accepted, the prisoners had the main gate open. The physical walls of the Maze had not disappeared.
The people and procedures connecting those walls had failed one after another.
Did Civilian Clothing Cause the Escape?
One political argument after the escape focused on changes in prison conditions following years of protest, including the government's decision to allow prisoners to wear civilian clothing. Hennessy considered that question directly. His inquiry concluded that the decision to permit civilian clothing did not contribute significantly, if at all, to the success of the escape.
The report instead emphasized failures in security practice, management, supervision, searching, gate operation, communication, and the segregation of a cohesive group of Provisional IRA prisoners in H7. The claim matters because it prevents later political narratives from replacing the findings of the inquiry.
The Guns Remain an Unknown
The weapons were indispensable. Hennessy said so directly. Without firearms, the prisoners could not have held so many officers under control across H7 and the main-gate complex. Yet the inquiry could not identify how they had entered the prison.
It examined multiple possibilities:
- supplies;
- vehicles;
- visits;
- professional visits;
- staff;
- weak prisoner searching after visits.
Several routes were plausible. None was proven. A good historical reconstruction has to stop there. “Unknown” is not a gap to be filled with the most dramatic theory.
It is the correct answer.
Evidence discipline
What the record supports
Status labels distinguish secure conclusions from uncertainty and rejected claims. Color is never the only signal.
DOCUMENTED
Thirty-eight Provisional IRA prisoners took part in the Maze breakout.
The official inquiry, Hansard, and contemporary records consistently identify a 38-man escape party.
Sources: SRC-001, SRC-002, SRC-004MYTH
All 38 prisoners successfully crossed the prison perimeter.
Hennessy records 35 as having breached the perimeter; three were recaptured in the gate-lodge area.
Sources: SRC-001MYTH
The Hennessy inquiry established how the guns were smuggled into the Maze.
The report identified several possible weaknesses but explicitly stated there was no evidence establishing how the guns or ammunition had entered.
Sources: SRC-001DOCUMENTED
Five guns were central to the escape plan.
The inquiry concluded that the planners obtained five guns and described five armed orderlies beginning the H7 takeover.
Sources: SRC-001DOCUMENTED
The kitchen lorry passed both the segment and administration gates without a revealing search.
Hennessy reconstructs both gates allowing the vehicle to proceed without discovering the concealed prisoners.
Sources: SRC-001DOCUMENTED
An alarm was raised at approximately 4:05 p.m. but initially dismissed as accidental.
A gate-lodge alarm reached the Emergency Control Room, which called back and accepted a coerced explanation from a captive officer.
Sources: SRC-001MYTH
Allowing prisoners to wear civilian clothing significantly caused the escape.
The Hennessy inquiry concluded that the government's civilian-clothing decision did not contribute significantly, if at all, to the escape's success.
Sources: SRC-001DOCUMENTED
James Ferris was stabbed three times during the breakout and later died.
The Hennessy report records the stabbing, his attempt to raise the alarm, collapse, and subsequent death.
Sources: SRC-001UNKNOWN
The public sources establish beyond ambiguity that Ferris died directly from the stab wounds themselves.
Hennessy records the sequence without supplying that medical causal formulation, while CAIN's Sutton material classifies Ferris among heart-attack deaths and the CAIN chronology describes a heart problem.
Sources: SRC-001, SRC-004, SRC-008Evidence, Myth and What the Hennessy Inquiry Found
Did 38 IRA prisoners escape from the Maze?
DOCUMENTED — WITH AN IMPORTANT DEFINITION
Thirty-eight prisoners took part in the moving breakout and are conventionally described as the Maze escapees. The Hennessy inquiry states that 35 actually breached the prison perimeter.
Did they tunnel out?
MYTH
No. The breakout depended on an armed seizure of H7, officers' uniforms and keys, a commandeered kitchen lorry, infiltration of the main-gate lodge, and then a final escape on foot or by hijacked car after the lorry exit was blocked.
Did the prisoners know the prison routine in detail?
WELL-SUPPORTED
Yes. The inquiry found that orderlies had obtained knowledge and freedom of movement that materially assisted planning and that prisoners had deliberately conditioned staff to reduce alertness.
Did the kitchen lorry pass internal gates without being searched?
DOCUMENTED
Yes. It passed both the segment gate and administration gate without a check sufficient to reveal the prisoners concealed inside.
Did the first alarm stop the escape?
NO
An alarm activated at about 4:05 p.m. was followed by a telephone check to the gate lodge. A captive officer, speaking under threat, said it had been accidental. The explanation was accepted.
The effective alarm was raised at approximately 4:12 p.m.
Do we know how the guns were smuggled into the Maze?
UNKNOWN
No. The Hennessy inquiry found several possible routes but stated that there was no evidence or information establishing how the guns or ammunition had actually entered.
Did allowing prisoners to wear civilian clothes cause the breakout?
MYTH / UNSUPPORTED AS A MAJOR CAUSE
The Hennessy Report concluded that civilian clothing did not contribute significantly, if at all, to the success of the escape.
Was James Ferris stabbed during the escape?
DOCUMENTED
Yes. He was stabbed three times, attempted to reach the pedestrian gate to raise the alarm, collapsed, and later died.
Did the stab wounds themselves directly cause his death?
SOURCE-SENSITIVE
The Hennessy Report does not supply the same medical shorthand used in later sources. CAIN's Sutton material places Ferris among deaths involving heart attacks, and CAIN's chronology says he died from a heart problem. The sequence of events is secure, while the precise medical causation is less certain.
Why the Breakout Worked
The Maze was protected by layers. The prisoners did not defeat those layers in one move. They moved through them sequentially. H7 staff could raise alarms.
The armed orderlies positioned themselves around the people controlling them. The block gate separated H7 from the next security area. Captured keys and an ordinary sweeping request got McFarlane through it before suspicion was raised. Thirty-eight prisoners could not walk together through the prison unnoticed.
They used the kitchen lorry. The lorry might be searched. It passed two gates without being checked. The main gate could not simply be driven through.
Uniformed prisoners infiltrated the lodge and seized it. An officer activated an alarm. The response system failed to recognize that the explanation from the gate lodge was being given under coercion. The prisoners opened the gate.
Then the plan finally encountered resistance it could not absorb. Cars blocked the lorry. The vehicle escape collapsed. The prisoners ran.
That last improvisation is why the numbers need precision. Thirty-eight took part in the breakout. Thirty-five got beyond the perimeter. The escape was both highly organized and partially improvised, both a prisoner operation and a major institutional security failure.
The official inquiry makes it possible to reconstruct those two truths at the same time.
Selected chronology
The afternoon of 25 September 1983
H7 takeover begins
Five armed prisoner orderlies move into position around key H7 staff and control points.
Prisoners control H7
The block is under prisoner control without a successful alarm being raised.
Kitchen lorry arrives
The normal food-delivery vehicle is seized and its driver forced to cooperate.
Escape party boards the lorry
Thirty-seven prisoners enter the rear while Gerry Kelly occupies the cab floor, bringing the moving party to thirty-eight.
Lorry leaves H7
The vehicle passes the segment and administration gates without the concealed escapees being discovered.
First alarm is activated
The Emergency Control Room checks with the gate lodge but accepts a captive officer's coerced explanation that the alarm was accidental.
Effective alarm raised
A captive officer gets to a telephone and successfully alerts the prison authorities, Army, and RUC.
Maze secured
The main gate is closed after the breakout; 35 prisoners have breached the perimeter.
Hennessy inquiry commissioned
The government asks Sir James Hennessy to investigate the Maze security arrangements bearing on the escape.
Hennessy Report published
The official inquiry documents the escape route and concludes that serious physical, procedural, managerial, and human security weaknesses contributed to the breakout.