
The Holzminden POW Escape: How 29 Officers Tunnelled Out of Germany in 1918
In the final months of the First World War, prisoners inside Germany's Holzminden officers’ camp accomplished one of the largest Allied POW breakouts of the conflict. Twenty-nine officers made it beyond the camp through a tunnel constructed in secret over roughly nine months. Nineteen would be recaptured. Ten eventually reached neutral Netherlands and freedom.
Those numbers tell only the end of the story.
Holzminden's tunnel had to solve a sequence of different problems: how officers could reach a hidden workplace without being noticed, where to put months of excavated soil, how to breathe inside an increasingly long passage, how to prevent the roof from failing, where the tunnel should emerge, and how dozens of men could be moved through it without alerting the guards.
The answer was not one ingenious trick. It was a system built and repeatedly modified inside a functioning prisoner-of-war camp.
A Camp Full of Escapers
Holzminden opened in September 1917 and held hundreds of British and Dominion officers together with other ranks serving as orderlies. It acquired a reputation for restrictive conditions and became associated particularly with prisoners who had already demonstrated an interest in escaping. Numerous men broke out or attempted to do so, but most were soon recaptured.
The camp's commandant, Karl Niemeyer, became deeply unpopular among the prisoners. Yet Holzminden's security problem was larger than Niemeyer himself. The officers faced perimeter wire and walls, sentries, patrols, illuminated ground around the enclosure and restrictions on movement between parts of the barracks.
Going over the perimeter exposed an escaper to observation almost immediately. Going underneath it offered another possibility.
The Hidden Space Beneath Kaserne B
The critical weakness was found inside Kaserne B.
Near the entrance used by the orderlies, a staircase covered a partition made from upright planks. Prisoners concluded that an unused space existed behind them. By loosening and modifying part of the partition, they created a concealed entrance into a chamber beneath the stairs. From there, they could attack the building's foundation and begin tunnelling outward.
The location solved one problem and created another.
Officers were not normally supposed to move freely through the orderlies’ area. Early tunnel workers therefore had to disguise themselves as orderlies and time their movements according to the position of German sentries. The men changed clothes before crossing into the restricted part of the building, then passed through the concealed partition and went underground.
Discovery of one disguised tunneller could have exposed the entire enterprise. Instead, this movement continued for months.
The First Exit Was No Longer Safe
The tunnel initially did not need to be enormous. From its underground base, the outer camp wall was relatively close.
By around Christmas 1917 the prisoners had tunnelled beyond it and prepared a chamber from which the final exit could eventually be opened. Then the security situation changed: a German sentry was positioned near the intended emergence point.
Breaking the surface there could expose the first man immediately and compromise everyone behind him. The solution was expensive but simple.
Keep digging.
Beyond the wall were open or low-crop areas covered by camp lighting. Farther away was taller vegetation capable of concealing men emerging from underground. The prisoners extended the tunnel in the hope of reaching useful cover.
The original short tunnel became a much larger engineering project.
Tunnel reconstruction
From Kaserne B beyond the camp perimeter
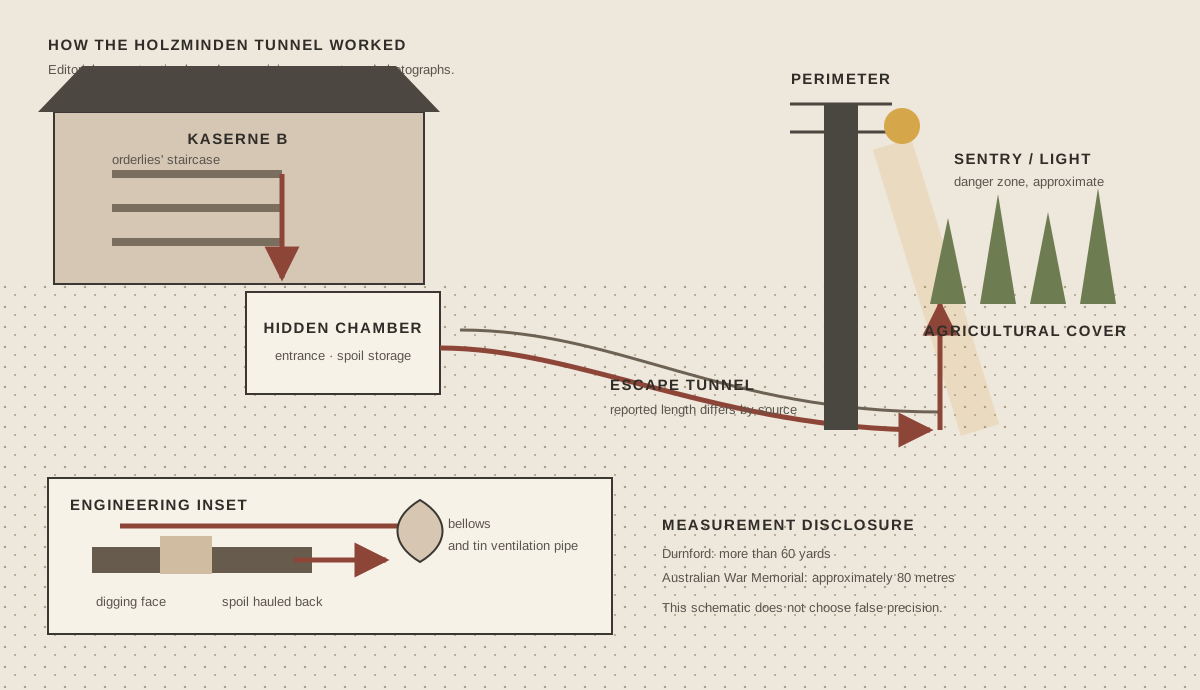
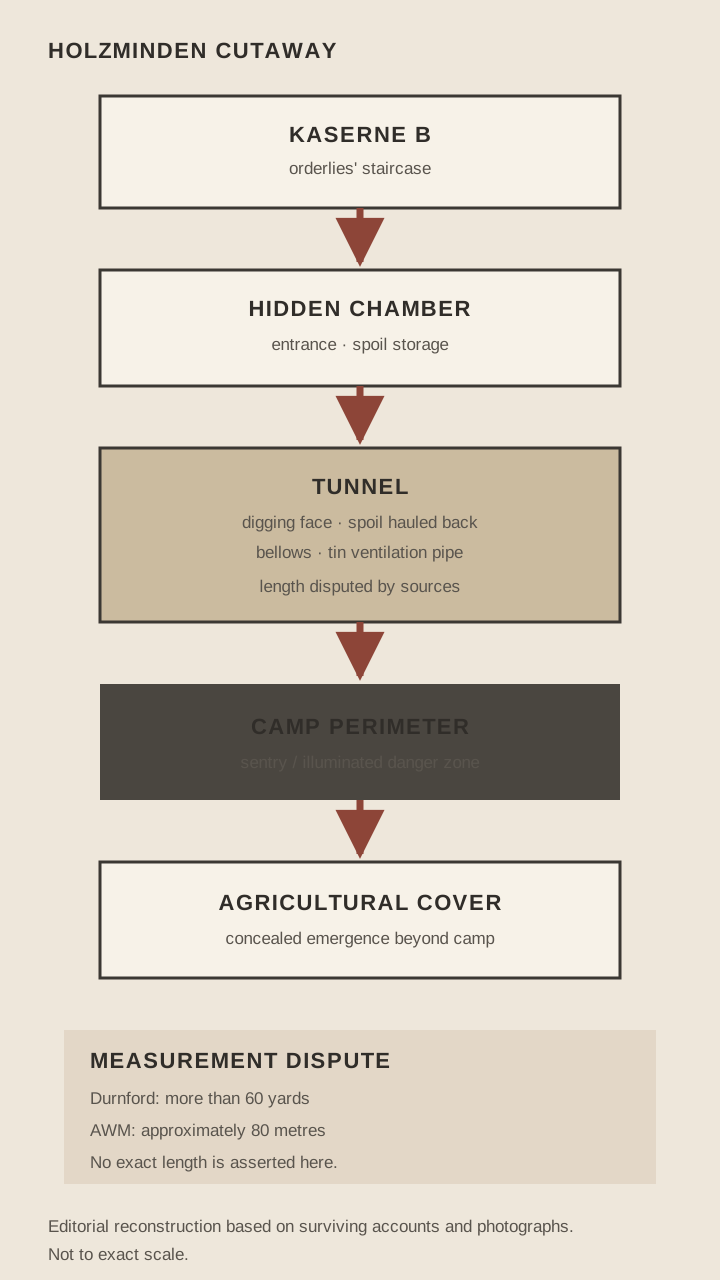
The cutaway shows the documented relationships while preserving disagreement over the tunnel's exact length.
- 01
Kaserne B
The route began within the prison barrack.
- 02
Orderlies' staircase
A concealed access led toward the hidden working chamber.
- 03
Hidden chamber
Excavated spoil and equipment could be managed out of direct view.
- 04
Tunnel
Digging, spoil movement and improvised bellows ventilation sustained the underground passage.
- 05
Perimeter danger zone
The route crossed beneath the guarded, illuminated camp boundary.
- 06
Agricultural cover
Twenty-nine men cleared the camp before traffic, congestion and loose material blocked the passage.
Editorial reconstruction based on surviving accounts and photographs. Not to exact scale. Durnford described more than 60 yards; the Australian War Memorial uses approximately 80 metres.
Digging an Escape Route Without Mining Equipment
The passage was deliberately kept extremely narrow because every additional inch excavated created more soil that had to be hidden.
Durnford describes men travelling through portions of the tunnel essentially by wriggling forward on elbows and toes. A basin attached to rope was used to move spoil away from the face. As bends and changes in elevation made that method less effective, sacks were dragged back instead.
The tunnel also required air.
Prisoners built a vertical bellows from wood and leather taken from a flying coat. The bellows forced air through a line constructed from tin tubing made out of food containers. As excavation advanced, additional sections were added so that air could continue reaching the working face. Surviving photographs held by the Australian War Memorial show part of the exposed tunnel with spoil bags and the improvised ventilation system.
Roof support presented another problem. Bed boards disappeared from the barracks and were repurposed underground as reinforcement where needed.
The work was improvised, but it was not casual.

Where Do You Hide a Tunnel?
Excavation created another danger: the spoil itself.
The chamber beneath the staircase served not only as the tunnel headquarters but as storage space for removed earth. Material was packed into available recesses and eventually filled much of the concealed area. Durnford later wrote that the space was only just sufficient for the soil produced by the tunnel.
Nothing about this could be obvious from the occupied rooms above.
That requirement explains several engineering choices. A larger passage would have been easier for men to crawl through but would have generated substantially more spoil. A tiny tunnel made excavation and escape physically harder, but concealment easier.
Security shaped the engineering.
Material evidence
Tools of Escape
The objects used in an escape reveal how a plan worked under constraint.
- 01Allowed excavation without conventional mining equipment
Improvised digging tools
Small hand tools including a trowel-like implement and cold chisel were used at the tunnel face.
- 02Made spoil movement possible inside the narrow passage
Rope and spoil container
A container attached to rope was used to move excavated material back from the working face.
- 03Ventilated the increasingly long underground passage
Homemade bellows
A wooden bellows incorporating leather forced air into the tunnel.
- 04Carried air toward the tunnel face
Tin ventilation tubing
Food containers were converted into connected sections of air pipe.
- 05Reduced collapse risk
Bed boards
Boards removed from camp beds were used to reinforce vulnerable portions of the roof.
- 06Supported post-breakout navigation
Escape maps
Maps were copied or prepared for prisoners attempting to navigate through Germany.
- 07Provided directional navigation after leaving the camp
Improvised compass
Stanley Purves carried a miniature homemade compass constructed from needles and concealed in a razor-blade wrapper.
The Escape Factory Above Ground
The tunnel was only the way out of Holzminden. It did not solve what happened next. An escaped officer would still be inside wartime Germany and had to reach a neutral frontier while avoiding police, soldiers and civilians who might identify him. Prisoners therefore accumulated maps, civilian clothing, food, money, compasses and other equipment.
One of the most important contributors never entered the tunnel during the breakout.
Australian Private John Richard “Dick” Cash, an orderly who had worked as a photographer before the war, obtained photographic equipment and a German map through trading involving Red Cross parcel goods. He reproduced sections of mapping for potential escapees. Australian War Memorial records state that more than 300 map copies were produced and distributed.
Cash remained behind. His wartime injuries had left him doubtful that he could complete the journey. But the maps he helped produce became part of the escape network.
Captain Stanley Purves carried another remarkable piece of homemade equipment: a tiny compass fashioned from needles and concealed inside a razor-blade wrapper. His surviving compass and hand-drawn map are now held by the Australian War Memorial.
Problem → response
Escape was a sequence of problems
Each response solved a practical obstacle while often creating the next one.
- 01→
Obstacle
Restricted access to the tunnel entrance
Officers risked discovery entering the orderlies' side of Kaserne B.
Response
Tunnel workers initially used orderlies' clothing and carefully timed movements.
- 02→
Obstacle
No safe exit immediately outside the wall
A sentry position and illuminated open ground threatened anyone emerging too close to the perimeter.
Response
The tunnel was extended toward agricultural cover.
- 03→
Obstacle
Poor air underground
The narrow and lengthening tunnel required forced ventilation.
Response
Prisoners constructed bellows and tin air piping.
- 04→
Obstacle
Excavated spoil
Large quantities of removed earth could expose the entire operation.
Response
Spoil was packed into the hidden chamber and available recesses.
- 05→
Obstacle
Unstable and stony soil
Stone layers slowed work and loose material later contributed to traffic problems.
Response
Workers used improvised tools, adjusted the tunnel's course and reinforced sections as necessary.
- 06→
Obstacle
Travel through wartime Germany
Leaving the camp did not put the fugitives in friendly territory.
Response
Escapees used maps, compasses, disguises, forged documentation, night movement and varied routes toward neutral borders.
They Still Had Not Reached the Field
By the end of June the tunnellers believed they were approaching the agricultural cover they wanted. They checked. They were short.
A narrow vertical probe was pushed upward so observers inside the barracks could determine where the tunnel had actually reached. According to Durnford, the marker appeared several yards before the desired rye. A nearer row of beans offered partial cover, so the tunnel was pushed toward that instead.
The clock was working against them. Crops would eventually be harvested, destroying the concealment they had spent months trying to reach.
By July, preparations for departure accelerated.
Maps were studied. Packs were assembled. Disguises were readied. Men who had spent months helping construct the tunnel received priority over the larger group waiting behind them.
Then even the date became complicated.

Which Night Did the Holzminden Escape Actually Happen?
Most modern institutional accounts date the escape to the night of 23–24 July 1918. Imperial War Museums and the National Army Museum use that chronology, as does the Australian War Memorial's current exhibition material.
Yet Hugh Durnford, who was Holzminden's British camp adjutant and helped organize movement on escape night, gives a different chronology in his 1920 account.
He says an attempt planned for the evening of 23 July was cancelled after an officer who was not supposed to be in Kaserne B managed to get inside. Durnford then dates the actual operation to the evening of 24 July, with men continuing through the tunnel after midnight.
A later 1939 anniversary account also gives 24–25 July. The discrepancy cannot presently be eliminated with confidence. What is certain is what happened once the operation began.
Twenty-Nine Men Disappeared
The first groups moved into the tunnel late in the evening.
Inside the barracks, men on the escape list waited dressed and prepared until called. Traffic was deliberately controlled so the corridors and restricted areas would not suddenly fill with suspicious movement.
Men passed through the attic access route, into the orderlies’ side of the building, down toward the concealed entrance and then into the tunnel. By the early hours, however, progress had slowed.
Durnford describes an unexplained interruption, followed later by a serious blockage. Men and their packs were inside the narrow passage, some unable to move forward and others struggling to retreat. A New Zealand officer helped extract men from the rear. Stones accumulated near a low point in the tunnel close to the final upward section.
Modern accounts often condense this into a simpler story: the next officer became stuck and the tunnel collapsed. That captures the basic result but gives more certainty about the mechanism than Durnford's detailed narrative permits.
When movement finally stopped, 29 men had cleared the camp. Dozens waiting behind them had not.
Escape from camp and final outcome
29escaped from Holzminden
Escaped from Holzminden
Officers who successfully cleared the camp through the tunnel.
Successfully reached neutral territory
Escapees who reached the Netherlands.
Recaptured
Escapees subsequently returned to German custody.
Escaping Holzminden Was Only the First Stage
Once outside, the fugitives separated into different groups and followed different plans.
Most faced a long journey west toward neutral Netherlands. They possessed varying levels of German, different disguises and different navigation equipment.
Lieutenant-Colonel Charles Rathborne, the senior British officer in the camp, adopted the most ambitious approach. Durnford records that Rathborne intended to exploit his German language skills, civilian disguise and forged documentation to travel by railway rather than hiding and walking the entire distance. He reached safety in only a few days.
Others moved principally at night and hid during daylight.
Australian Lieutenant Peter William Lyon travelled for 12 days and approached the Dutch frontier before German sentries captured him. His surviving papers include an attested copy of the charge sheet later used against recaptured Holzminden escapees.
Captain Stanley Purves succeeded. Australian War Memorial records place him in the Netherlands by 8 August, having navigated with his hand-drawn map and improvised compass.
Ultimately the count settled at:
29 out.
19 recaptured.
10 across the border.
The Men Who Were Caught
The recaptured officers did not simply return to ordinary camp routine.
They were eventually prosecuted collectively on charges connected with the escape and damage to German property. Durnford records that the court sat at Holzminden on 27 September and imposed six-month terms of imprisonment, but that the sentences were never carried out before the Armistice ended the war. Australian War Memorial material concerning Lyon independently records the proceedings and the six-month sentence.
For the ten men who reached the Netherlands, captivity was effectively over. For everyone else at Holzminden, the tunnel itself remained behind as evidence of what had happened.
What the Photographs Still Show
Holzminden is unusual because the physical escape mechanism did not disappear entirely into memoir.
Surviving photographs show the exposed tunnel, its route outside the compound and portions of the improvised ventilation and spoil system. Dick Cash photographed the tunnel after its discovery, and several of his images are preserved by the Australian War Memorial.
His photographs matter because they provide an independent check on some of the engineering described in written accounts. The tunnel existed. The air system existed. The hidden maps existed.
Purves's tiny compass survives. Lyon's charge sheet survives. The story can therefore be reconstructed from objects and records, not merely from later adventure narratives.
What We Still Cannot Say With Certainty
The strongest version of the Holzminden story is not the simplest one. The exact calendar night remains disputed. The tunnel's reported length varies substantially between Durnford's contemporary account and modern museum descriptions. The popular explanation that “the 30th man got stuck and collapsed the tunnel” may simplify a more complicated sequence of congestion, loose stones and partial blockage.
Even the precise number originally scheduled to leave varies according to how the waiting parties are counted. None of those uncertainties weakens what the prisoners accomplished. For roughly nine months they concealed an underground engineering project inside a guarded POW camp, improvised ventilation and excavation systems from the objects available to them, prepared maps and disguises for the journey after escape, and moved 29 officers outside the perimeter before the passage failed.
Ten then completed the far more difficult second escape: across Germany itself.
Evidence discipline
What the record supports
Status labels distinguish secure conclusions from uncertainty and rejected claims. Color is never the only signal.
DISPUTED
The escape definitely occurred on the night of 23-24 July 1918.
Several modern institutions use 23-24 July, but Durnford explicitly says the 23 July attempt was cancelled and dates the actual operation to the evening of 24 July.
Sources: SRC-001, SRC-002, SRC-009, SRC-010DISPUTED
The tunnel was exactly 80 metres long.
Australian War Memorial material gives approximately 80 metres, whereas Durnford described the tunnel as more than 60 yards.
Sources: SRC-001, SRC-002DISPUTED
The 30th escapee became stuck and caused the tunnel to collapse.
Modern summaries frequently give this explanation. Durnford records a more complicated blockage and says the cause of an earlier interruption was never established.
Sources: SRC-001, SRC-002, SRC-009MYTH
John Richard Cash escaped through the tunnel.
Cash played a major support role producing maps and photographing the tunnel but did not participate in the breakout.
Sources: SRC-002, SRC-011DOCUMENTED
The improvised tunnel ventilation system existed.
Durnford describes the bellows and tin piping, while surviving photographs show portions of the ventilation arrangement.
Sources: SRC-001, SRC-006Selected chronology
Construction, breakout and flight
Holzminden opens
The officers' POW camp begins operating at Holzminden.
Tunnel project begins
Prisoners begin constructing the tunnel from a concealed chamber associated with Kaserne B.
Original exit compromised
The tunnel has passed the outer wall, but a newly positioned sentry makes the planned emergence point unsafe.
Exit position tested
The tunnellers determine that they have not yet reached the desired crop cover and extend the passage farther.
The breakout
Twenty-nine officers clear the camp through the tunnel before the passage becomes blocked. Exact calendar dating is disputed.
Escapees pursued
Nineteen men are recaptured; ten reach neutral Netherlands.
Recaptured escapees sentenced
The recaptured officers receive six-month sentences that are never ultimately carried out.