
The Cowra Breakout: Inside the Deadly 1944 Mass Escape of Japanese POWs in Australia
Shortly before 2 a.m. on 5 August 1944, a bugle sounded inside a prisoner-of-war camp near Cowra, New South Wales.
Then hundreds of Japanese prisoners moved toward the wire.
They carried no captured arsenal. Their weapons included sharpened knives, baseball bats, clubs and other objects improvised inside the camp. Blankets and heavy clothing were thrown over or pressed against the barbed-wire obstacles. Some prisoners rushed into the broad internal lane known as Broadway. Others struck the external perimeter. Australian guards opened fire. [SRC-002] [SRC-003] [SRC-005] [SRC-006]
Within a short time, the breakout had become one of the bloodiest prisoner-of-war incidents on Australian soil during the Second World War.
The final corrected death toll was 234 Japanese prisoners. Three Australian guards were killed during the initial violence, and Lieutenant Harry Doncaster was killed later that day during the search for escapees. Hundreds of Japanese prisoners crossed out of their own compound; 378 got outside the camp itself. Every surviving escapee was eventually recovered. [SRC-001] [SRC-002] [SRC-003]
The physical sequence is extraordinary enough. The harder question is why.
Cowra was nowhere near Japanese-held territory. The prisoners did not have a realistic route home. Material conditions in the camp were not the immediate cause. And not every man wanted to participate.
The Cowra Breakout makes sense only when the wire, the weapons and the machine guns are reconstructed alongside something less visible: the destructive meaning that wartime Japanese military culture could attach to the fact of being captured alive.
A prison camp far from the battlefield
No. 12 Prisoner of War Camp stood roughly three kilometres from Cowra in central-western New South Wales. It had been established during the war and eventually held prisoners and internees of several nationalities. By August 1944, 1,104 Japanese prisoners were housed in B Compound, guarded by the 22nd Garrison Battalion. [SRC-002] [SRC-003] [SRC-006]
The camp’s geometry mattered.
Sissons, working from the 1944 inquiry, described the overall camp as a roughly twelve-sided polygon divided into four compounds by broad lanes. Each compound had multiple lines of barbed wire. B Compound’s barriers included three fences roughly two metres high, separated by spaces filled with additional entanglement and concertina wire. Sentry towers stood at key points, while guards patrolled the outside. [SRC-003]
This was not a prison designed around a single wall that could be climbed once. A prisoner trying to get out had to cross a system.
Yet Australian authorities already knew that the system was not impossible to breach. A Japanese officer, Second Lieutenant Naka Masao, had escaped in 1943 and was recaptured several hours later. During the inquiry into that episode, he demonstrated that the fences and intervening wire could be crossed in less than three minutes. [SRC-003]
That demonstration became more important a year later.
The warning came two months before the breakout
On 3 June 1944, a Korean prisoner told an Australian interpreter that he had heard Japanese prisoners discussing plans for a breakout. The warning was taken seriously.
Lieutenant Colonel M. A. Brown, commanding the Cowra garrison, argued that if hundreds of Japanese prisoners rushed the wire together, heavy casualties were inevitable and some prisoners would probably get out. He asked for additional weapons and for B Compound’s population to be reduced. Two Vickers medium machine guns and other arms were subsequently supplied. Land Headquarters also approved a plan to separate non-commissioned officers from the rank and file and move many of the latter to Hay. [SRC-003]
The defensive response therefore contained a grim paradox. The transfer was intended to reduce the danger of a mass breakout. Its announcement became the immediate occasion for one.
What captivity meant
Why would prisoners thousands of kilometres from Japanese lines rush barbed wire covered by machine guns?
The strongest evidence does not point to starvation, brutal camp labor or systematic mistreatment as the answer. The later Australian inquiry said the prisoners had made no prior treatment complaints. Sissons cites a neutral International Committee of the Red Cross inspection from March 1944 that described the material treatment positively. [SRC-001] [SRC-003]
The deeper problem was ideological and social.
Imperial Japanese military training had made surrender deeply shameful. Prisoners captured alive sometimes gave false names because they did not want their families to know they had survived captivity. Hajime Toyoshima—the pilot who would later sound the Cowra bugle—had himself used the false identity Tadao Minami after his capture. [SRC-006] [SRC-007]
But “Japanese military culture” cannot be used as a magic phrase that explains every man identically.
The prisoners were individuals. Some wanted to live. Some appear to have wanted death. Others were caught between personal reluctance and collective expectations.
Marekuni Takahara later remembered that when the prisoners voted on the breakout, he voted yes even though he had wanted to vote no. [SRC-005]
That memory is crucial. The Cowra Breakout was collective action, but collective action did not mean unanimous enthusiasm.
The transfer notice
On 4 August 1944, the prisoners were formally told of the planned move to Hay.
The exact rank language differs among modern summaries, but the basic policy was to move rank-and-file or junior prisoners and separate them from many of the non-commissioned officers. The prisoners met and decided to act. [SRC-002] [SRC-003] [SRC-005]
The transfer notice is often presented as though it suddenly created the escape plan. That goes too far.
Australian authorities had already received the June warning. Sissons’s reading of participant testimony suggests that separation of the NCOs was not necessarily the true underlying grievance. He argues that a militant element committed to erasing the shame of captivity through death or violent action may have been capable of forcing a breakout under another immediate pretext. [SRC-003]
The most defensible conclusion is therefore:
the transfer was the trigger, not the whole cause.
Camp reconstruction
Four groups, two kinds of movement
Two groups moved into Broadway and were contained inside the larger camp. Two attacked the external perimeter. Crossing internal space was not the same as escaping the camp.
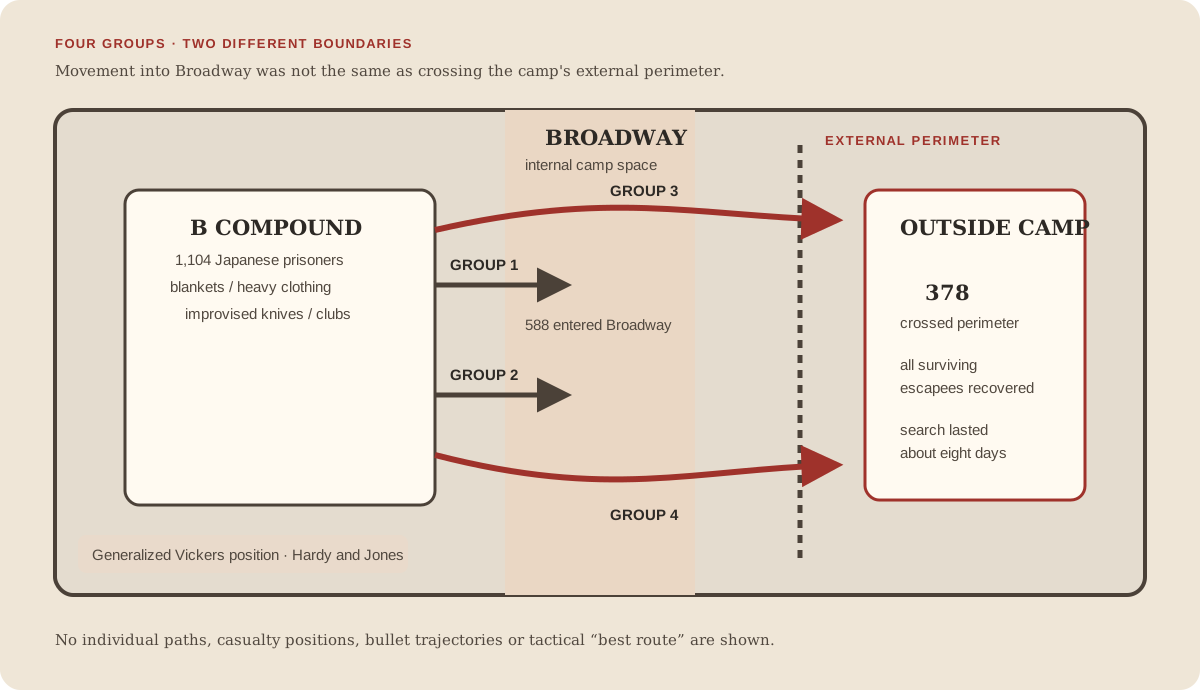

- 01
B Compound
1,104 Japanese prisoners were held in the compound.
- 02
Four groups
Two groups moved into Broadway; two attacked the external perimeter.
- 03
Wire
Blankets and heavy clothing were used against barbed wire.
- 04
Outside
Inquiry-based reconstruction gives 378 prisoners beyond the external perimeter.
- 05
Recovery
All surviving escapees were recovered during a search lasting roughly eight days.
Schematic, not to scale. Based on the 1944 inquiry reconstruction as analyzed by D. C. S. Sissons. Exact individual prisoner paths are not known.
Four groups
The prisoners organized themselves into four groups, broadly corresponding to where they slept. That detail corrects simplified retellings that imagine one undifferentiated human wave hitting one section of fence.
Two groups moved toward Broadway, the wide central lane separating the compounds. They broke out of B Compound but remained inside the larger camp system and were ultimately contained there.
Two other groups attacked the external side of the camp polygon.
Those breaches were more successful. [SRC-003]
The plan also included an instruction that civilians were not to be harmed. The Australian War Memorial attributes that order to Army Sergeant Major Akira Kanazawa, identified as one of the breakout’s ringleaders. Despite the violence directed at Australian military personnel, no civilian was reported injured in the breakout or subsequent encounters. [SRC-005] [SRC-006]
The bugle
Shortly before or around 2 a.m., Hajime Toyoshima sounded a bugle.
The instrument survives in the Australian War Memorial’s collection. The museum can establish that Toyoshima used it to signal the breakout, but even the bugle’s earlier provenance is uncertain: its precise path into Toyoshima’s hands is unknown. [SRC-006] [SRC-007]
Toyoshima’s own history captures the contradictions of Cowra.
He had been a Japanese naval aviator and became the first Japanese POW captured on Australian soil after his aircraft came down on Melville Island in 1942. He concealed his real identity in captivity. At Cowra, he gave the signal for the breakout. He was later found dead by suicide in a ditch outside the perimeter. [SRC-006] [SRC-007]
The bugle did not announce a carefully concealed escape. It announced an assault.

Blankets against the wire
The physical method was crude but not random.
Prisoners used blankets, coats and other heavy material to reduce the effect of the barbed wire. Contemporary photographs taken after the breakout show blankets still draped across the fences. Recovered objects included sharpened knives and other improvised weapons. DVA also records baseball gloves used to protect hands against the wire. [SRC-005] [SRC-012] [SRC-013]
Inside the compound, barracks were set on fire. DVA says twenty camp barracks burned. Some prisoners who did not join the outward rush died by suicide inside B Compound. [SRC-003] [SRC-005] [SRC-014]
The breakout was therefore happening in several directions at once:
- men moving into Broadway;
- men crossing the external fences;
- prisoners attacking Australian positions;
- sentries firing into assaulting groups;
- buildings burning behind them;
- suicides occurring inside and outside the compound.
Any reconstruction that shows only “prisoners climb fence and escape” misses the event.


The Vickers position
One of the decisive points lay near an external breach.
The garrison had received two Vickers medium machine guns after the June warning. But the guns came without enough additional personnel to keep them permanently manned. Sissons argues that this created a serious defensive weakness. [SRC-003]
During the breakout, prisoners got through the northernmost external breach before the crew of one Vickers position was in place. From outside the wire they were then able to attack the second Vickers gun, located only about fifty metres from the fence.
Privates Benjamin Gower Hardy and Ralph Jones fought at that gun position. According to the inquiry-based reconstruction, the crew fired more than eighty rounds before being overrun. Both men were killed. The weapon was rendered unusable before it could be turned on the Australians. Hardy and Jones were later awarded the George Cross posthumously. [SRC-003] [SRC-015] [SRC-016]
The deaths of Hardy and Jones are often told as an isolated act of heroism. They were also part of the escape mechanics. Once that Vickers position was neutralized, one section of the external wire lost its strongest planned field of fire.
Movement and consequence
378crossed the external perimeter
Crossed external perimeter
Inquiry-based reconstruction gives 378 prisoners as having got outside the camp.
Japanese dead
Corrected total including three prisoners who later died of wounds; the original inquiry reported 231.
Australians killed directly
Hardy, Jones and Shepherd were killed during the initial breakout; Doncaster was killed during the search later on 5 August.
Additional indirectly related Australian death
Thomas Hancock died after an accidental shooting while assembling for breakout-related security duty.
Surviving escapees remaining free
All surviving prisoners who crossed the perimeter were ultimately recovered.
Who actually got out?
Modern summaries frequently say that “about 545” prisoners attempted the escape. The underlying inquiry data are more complicated—and more useful. Of the 1,104 Japanese prisoners in B Compound:
- 588 got through breaches into Broadway;
- 378 crossed the external perimeter and got outside the camp;
- 138 remained inside B Compound.
Of those 138, 20 died by suicide before or during the breakout. [SRC-003]
These figures do not fit neatly with the AWM’s modern “approximately 545 attempted escape” figure; the discrepancy remains part of the evidence. If the question is how many actually escaped the camp perimeter, the strongest answer is 378. That is the number that matters for the manhunt that followed.

The cost inside the camp
Three Australian soldiers were killed during the initial breakout.
Hardy and Jones died at the Vickers position. Private Charles Henry Shepherd was stabbed and killed during the violence. Three other guards were wounded according to the Australian War Memorial’s modern summary. [SRC-002] [SRC-005] [SRC-006]
Japanese casualties were vastly greater.
The original military inquiry put the Japanese death toll at 231. That number remains on the National Archives of Australia’s fact sheet and in older accounts. Later historian D. C. S. Sissons went back through the records and identified three wounded prisoners who subsequently died from their injuries. Adding them produces the now accepted total of 234 Japanese dead. [SRC-001] [SRC-003]
The wounded figure also requires care.
The AWM says 108 wounded. Sissons lists 105 wounded after moving the three later deaths into the fatality total. Both numbers can therefore describe different stages of the casualty accounting. [SRC-002] [SRC-003]
The dead did not all die in the same way. Some were killed by Australian gunfire while attacking or crossing the camp defenses. Some died by suicide. Some were killed by other prisoners. The official inquiry itself recognized that a substantial number of deaths and wounds were self-inflicted or inflicted by fellow prisoners. [SRC-001] [SRC-003]
Reducing all 234 deaths to “shot by guards” is false. Reducing them all to “suicide” is false too.
Problem → response
Escape was a sequence of problems
Each response solved a practical obstacle while often creating the next one.
- 01→
Obstacle
Triple barbed-wire system
B Compound was surrounded by multiple fences, concertina wire and additional entanglements.
Response
Prisoners used blankets, clothing and simultaneous pressure at multiple breach points.
- 02→
Obstacle
Sentry towers and patrols
Armed sentries covered the compounds and outer perimeter.
Response
Four groups attacked different sectors at once, dispersing the defense.
- 03→
Obstacle
Vickers medium machine guns
Two medium machine guns had been installed after warnings of a possible mass breakout.
Response
Prisoners exploiting an external breach attacked the nearby No. 2 Vickers position and overran its crew.
- 04→
Obstacle
Isolation from Japanese-held territory
Cowra was deep inside Australia with no realistic route back to Japanese forces.
Response
For many participants the breakout appears to have prioritized rejection of captivity, collective action or death rather than a realistic strategic return to friendly lines.
- 05→
Obstacle
Post-breakout search
Military patrols and local authorities searched the surrounding district for hundreds of prisoners.
Response
Escapees dispersed through the countryside, but surviving prisoners were recovered within about eight days.
The search beyond the wire
The 378 prisoners who reached open country created a second phase of the event.
Search parties spread through the countryside around Cowra. Some prisoners traveled roughly 15 kilometres from the camp. The last were not recovered until about eight days later. [SRC-003]
Sissons’s reconstruction gives a more precise meaning to the frequently quoted statement that 334 prisoners were retaken. Of those 334 recovered outside the immediate camp area:
- 309 were alive;
- 25 were dead.
Most of the remaining 44 who had crossed the external perimeter were found dead closer to the camp. [SRC-003]
So “334 recaptured” is technically misleading if it suggests 334 living prisoners were marched back into custody. The search was also not bloodless.
Late on 5 August, Lieutenant Harry Doncaster of the 19th Australian Infantry Training Battalion was killed after a search party encountered a group of escapees. His death makes him the fourth Australian directly killed in the breakout and recapture operation. [SRC-001] [SRC-005]
The fifth Australian
Some Cowra memorial material says five Australians died. That is not necessarily an error, but it uses a broader definition.
On 7 August, Sergeant Thomas Roy Hancock, a 53-year-old member of the Volunteer Defence Corps, was assembling with other men for patrol duty connected to security concerns after the breakout. A rifle discharged accidentally and wounded him. He later developed complications and died. A court of inquiry concluded that his death had been indirectly brought about by the breakout because he had been on authorized breakout-related duty. [SRC-010]
The cleanest accounting is therefore:
Four Australians were killed directly during the breakout and recapture. A fifth, Thomas Hancock, died after an accidental shooting while mobilizing for related security duty.
That distinction should be preserved everywhere on the site.
The civilians the escapees did not attack
A mass escape of armed prisoners understandably frightened the district. Yet one striking part of the record is what did not happen.
The breakout leadership had instructed prisoners not to attack civilians. The Australian War Memorial says that order was followed. DVA cites contemporary reporting that homes were not broken into and civilians were not injured. [SRC-005] [SRC-006]
Later oral histories include encounters that feel almost incompatible with the violence at the camp. Members of the Weir family recalled Japanese escapees arriving at a farmhouse looking for food and being given tea and scones before the men were later recaptured. [SRC-005]
Those stories should not be used to sentimentalize the breakout. They matter because they show that the prisoners distinguished between the military guards they had chosen to attack and the civilian population outside.
Evidence discipline
What the record supports
Status labels distinguish secure conclusions from uncertainty and rejected claims. Color is never the only signal.
MYTH
Exactly 231 Japanese prisoners died in the Cowra Breakout.
231 was the original inquiry figure. Later archival reconciliation added three men who died from wounds received during the incident, producing the now accepted total of 234.
Sources: SRC-001, SRC-002, SRC-003DISPUTED
Approximately 545 prisoners attempted to escape.
The AWM uses approximately 545, but the detailed inquiry movement categories reproduced by Sissons show 588 entering Broadway and 378 crossing the external perimeter, with 138 remaining in B Compound. The counting definition behind 545 is unclear.
Sources: SRC-002, SRC-003MYTH
All 1,104 Japanese prisoners eagerly joined the breakout.
Inquiry figures show 138 remained inside B Compound, and later participant testimony records private reluctance despite public support for the vote.
Sources: SRC-003, SRC-005DISPUTED
The transfer to Hay alone caused the breakout.
The transfer notice was the immediate occasion, but discussions of breakout had been reported two months earlier and Sissons argues that a militant faction's determination to erase the shame of captivity was more fundamental.
Sources: SRC-003MYTH
Poor food or systematic mistreatment drove the prisoners to break out.
The inquiry and ICRC evidence cited by Sissons do not support material deprivation or systematic brutality as the immediate cause.
Sources: SRC-001, SRC-003DISPUTED
Australian gunfire and recapture actions were completely and finally exonerated by the 1944 inquiry.
The inquiry found firing controlled and recapture force legitimate, but later archival scholarship identifies credible evidence of some indiscriminate fire and several recapture deaths that were insufficiently investigated.
Sources: SRC-001, SRC-003MYTH
Japanese escapees attacked local civilians.
The breakout leadership ordered civilians not to be harmed, and Australian institutional sources state that no civilians were injured.
Sources: SRC-005, SRC-006MYTH
Five Australians were killed by Japanese prisoners during the breakout.
Four Australians were directly killed in the breakout and recapture. A fifth, Thomas Hancock, later died after an accidental firearm discharge while mobilizing for related security duty.
Sources: SRC-001, SRC-002, SRC-010What the inquiry said
A military Court of Inquiry began taking evidence within days.
Its principal findings, later summarized publicly by Prime Minister John Curtin, were broadly favorable to the garrison. The inquiry found that camp conditions met the relevant POW standards, that the breakout was premeditated and concerted, that Australian resistance prevented greater loss of life, and that firing ceased when control had been restored. [SRC-001]
On the main firefight, Sissons does not simply overturn that conclusion. He found credible later evidence that some indiscriminate shooting occurred, but he also judged that the inquiry’s broad characterization of firing during the central breakout was not unreasonable. [SRC-003]
The recapture phase is harder.
Sissons identified cases in which Japanese prisoners died under circumstances that should have prompted more probing investigation. He argues that the inquiry’s blanket conclusion that there was no illegitimate use of force during recapture went beyond what its own investigation could securely establish. [SRC-003]
That leaves an important evidence boundary. It would be wrong to claim that the inquiry proved every Australian shooting lawful. It would also be wrong to convert unresolved or suspicious deaths into a proven systematic execution policy. The honest historical answer is that some recapture deaths remain inadequately resolved in the surviving inquiry process.
Was it really an escape?
The word “breakout” fits Cowra better than the romantic language of “escape.”
Hundreds of prisoners did get through the camp perimeter. Some remained at large for days. In that literal sense, it was a genuine escape operation. [SRC-003]
But escape to where?
There was no realistic path back to the Japanese military. The prisoners were deep inside Australia. For many participants, the act appears to have been less about reaching a destination than about refusing the status of prisoner, restoring lost honor, obeying collective pressure or dying in the attempt. [SRC-003] [SRC-005] [SRC-006]
That does not mean every man wanted to die. It means the physical objective—getting through the wire—cannot by itself explain the historical event.
After Cowra
The surviving Japanese prisoners were divided and moved to other camps, including Hay and Murchison. After the war they were repatriated. [SRC-006]
Cowra itself developed a very different relationship with the dead.
Beginning in the postwar years, local veterans and residents cared for Japanese graves. The Cowra Japanese War Cemetery eventually became a formal site of commemoration. Today the adjoining Japanese cemetery contains 523 graves, including prisoners who died during the Cowra Breakout, Japanese aircrew and civilian internees who died in Australia during the war. [SRC-009]
The town later became associated not only with the violence of August 1944 but with Australian-Japanese reconciliation. That legacy should not be used to soften what happened. Its power comes from the opposite fact: reconciliation developed at the site of an event in which guards and prisoners killed each other at close range, hundreds of men died, and wartime ideas of honor made survival itself feel shameful to some of the people behind the wire.
The real Cowra Breakout
The Cowra Breakout is often reduced to one striking image: Japanese POWs charging barbed wire under machine-gun fire. The evidence is more complicated.
Australian officers had been warned about a possible mass breakout two months earlier. The garrison received additional weapons, but not enough extra personnel to keep its strongest positions continuously crewed. A prisoner transfer meant to reduce the danger became the immediate trigger. A vote concealed private reluctance. Four groups attacked different parts of the camp. Two groups were contained inside Broadway. Two penetrated the external perimeter. Hardy and Jones held a Vickers position until they were overrun. Hundreds made it into the countryside. No civilian was harmed. Suicide and combat deaths occurred together. The search continued for days. [SRC-003] [SRC-005] [SRC-006]
The event was therefore neither a simple escape nor a meaningless rush toward death. It was the catastrophic collision of a vulnerable camp defense, wartime Japanese ideas about capture and shame, collective coercion, a badly timed transfer order, improvised tactics, and individual decisions made under pressure. The wire explains how Cowra happened. The prisoners’ understanding of captivity explains why so many were willing to reach it.
Selected chronology
Warning, breakout, search and inquiry
Warning of a possible breakout
A Korean prisoner informs an Australian interpreter that Japanese prisoners have been discussing a breakout.
Additional weapons arrive
Following security discussions, extra weapons including Vickers medium machine guns are delivered to Cowra.
Transfer policy ordered
Land Headquarters orders a reduction of B Compound by separating NCOs from rank-and-file prisoners and moving the latter to Hay.
Prisoners notified of transfer
Japanese prisoners receive formal notice of the impending transfer, becoming the immediate occasion for the breakout decision.
Cowra Breakout
The bugle sounds and four groups attack different parts of the camp. Two external breaches succeed; 378 prisoners get outside the perimeter.
Harry Doncaster killed
Lieutenant Harry Doncaster is killed during an encounter with escapees during the search north of the camp.
Thomas Hancock accidentally shot
Sergeant Thomas Hancock is wounded by an accidental rifle discharge while assembling for breakout-related security duty; he later dies.
Search effectively completed
The last surviving escapees are recovered after roughly eight days at large.
Court of Inquiry findings issued
The military inquiry issues findings on the breakout, casualties and Australian response.
Curtin reports to Parliament
Prime Minister John Curtin reads a summary of the inquiry findings to the House of Representatives.